Generate Expense Report (Concordia University)

In Concordia University, Masters or Ph.D. students even the faculty members need to travel for attending conferences or events and pay from their own pockets. Concordia then reimburses their payment. The reimbursement process is described below.

Step 1: Go to the my concordi.ca and then choose “Continue to the new website”

Select New website

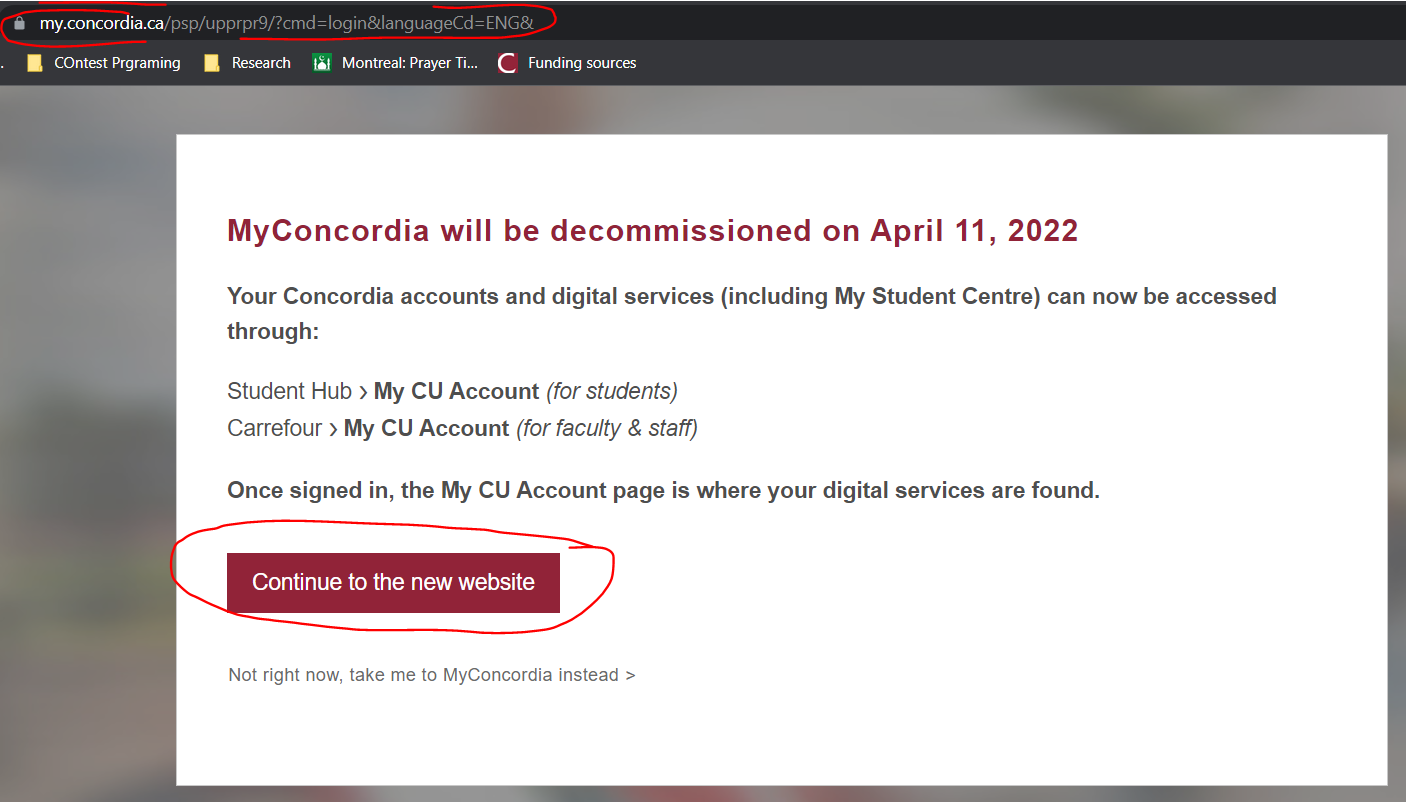
Login using the Employee Netname and Password

2nd Step: Scroll a bit down and select “Unity” from your homepage

Select Unity

3rd Step: from unity home page select “My Expense Report”
NB: In this step you have to log in again to your employee account using multifactor authentication.

Select My Expense Report

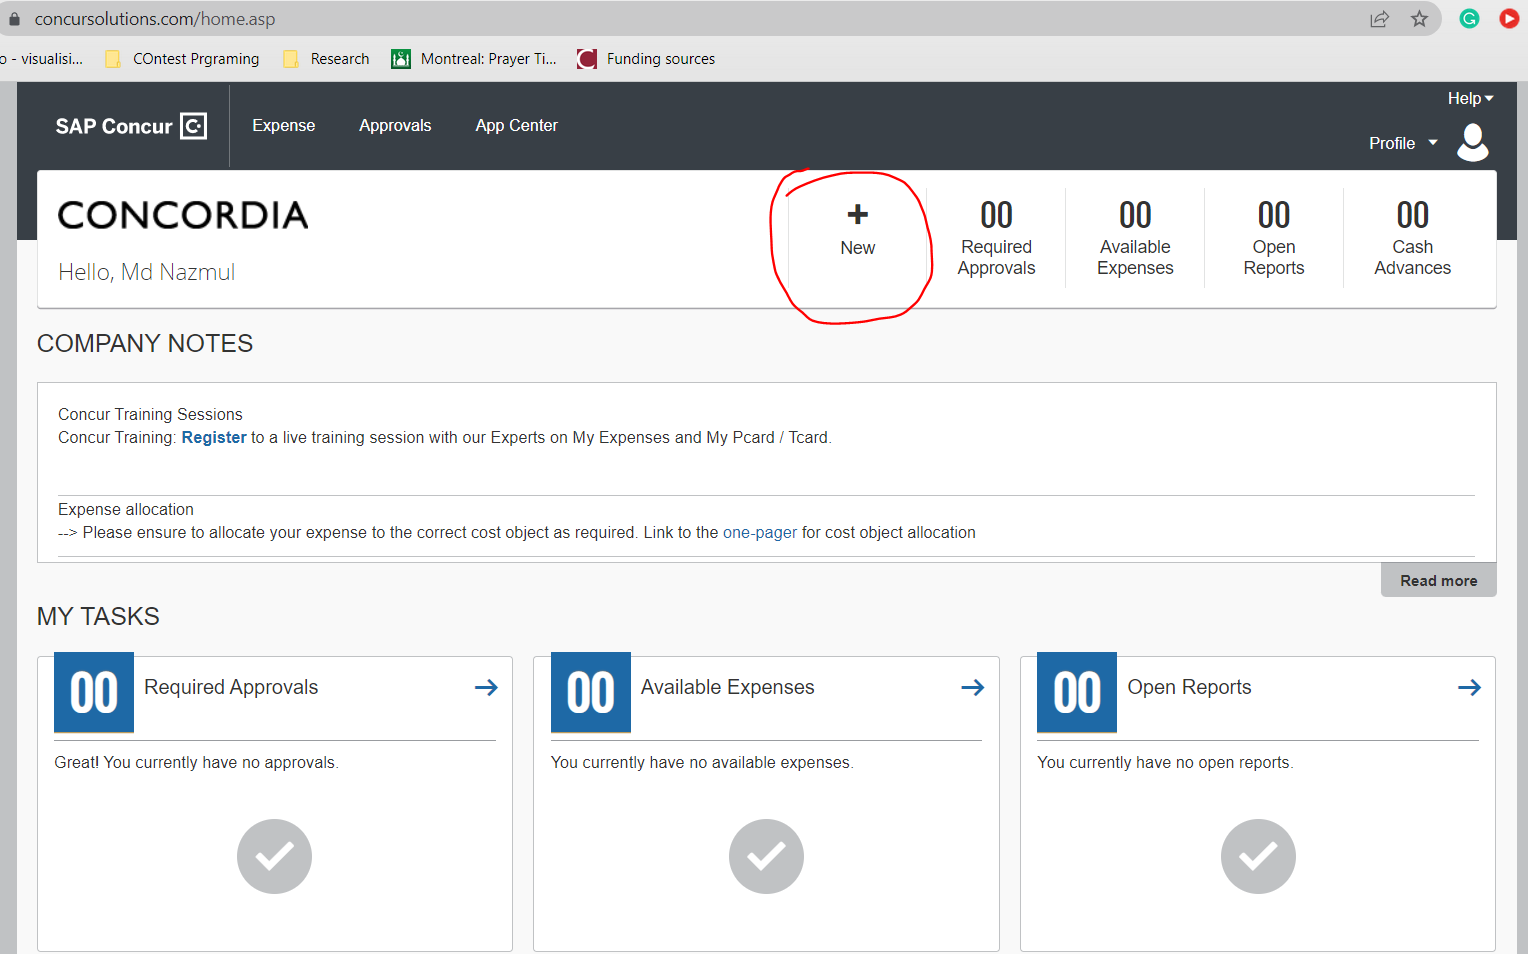
4th Step: You will be redirected to concursolution home page. Click on “+” button and then select “start a report” to begin

Click + to start a report

5th Step: Fill up the form with appropriate information.

Description of the form:
1. Report Name: Any name withing word limit
2. Business purpose: Write the purpose
3. Travel Category: Select appropriate one. I selected External Event as I was attending conference online.
4. Cost Object Type: Ask the professor for the appropriate code.
Cost Center (CC) is used for departmental fund
Internal Order is used for External Research Grant
WBS is used for other complex purpose.
Check this document for details: https://hub.concordia.ca/content/dam/cspace/projects/unity/APPROVED-UNITY-Whatcostobject.pdf
5. Comment is optional

Click on Next button:

If you have an intinerary, input them, otherwise select “NO”

6th Step: Select Expense Type. I have selected Registration Fees

Input the required information in the given form. If you paid your expense other than CAD select the appropriate currency.

Select the exact conversion rate of the payment date. You will find it in your bank statement.
Click on Save Button.

7th Step: Attach Receipts: To attack receipts click on “Attach Recipt” Button below. It will show you the optio to upload receipt. Then click on attach.
NB: If you want to add multiple documents as the proof of payment. You need to attack one file then click on the “Save” Button and then again click on the “Attach Receipt” button and repeat the process.

8th Step: Allocate and check: Click on the Allocate Button and check whether the given grant name and code is OK or not.
Click on “Save” and then click on “Done”

9th Step: Submit: Click on the “Submit Report” Button to submit the report

You can save the report by clicking “Print *Concordia Report Detailed”
and then click on the “Accept & Submit” button.

NB:

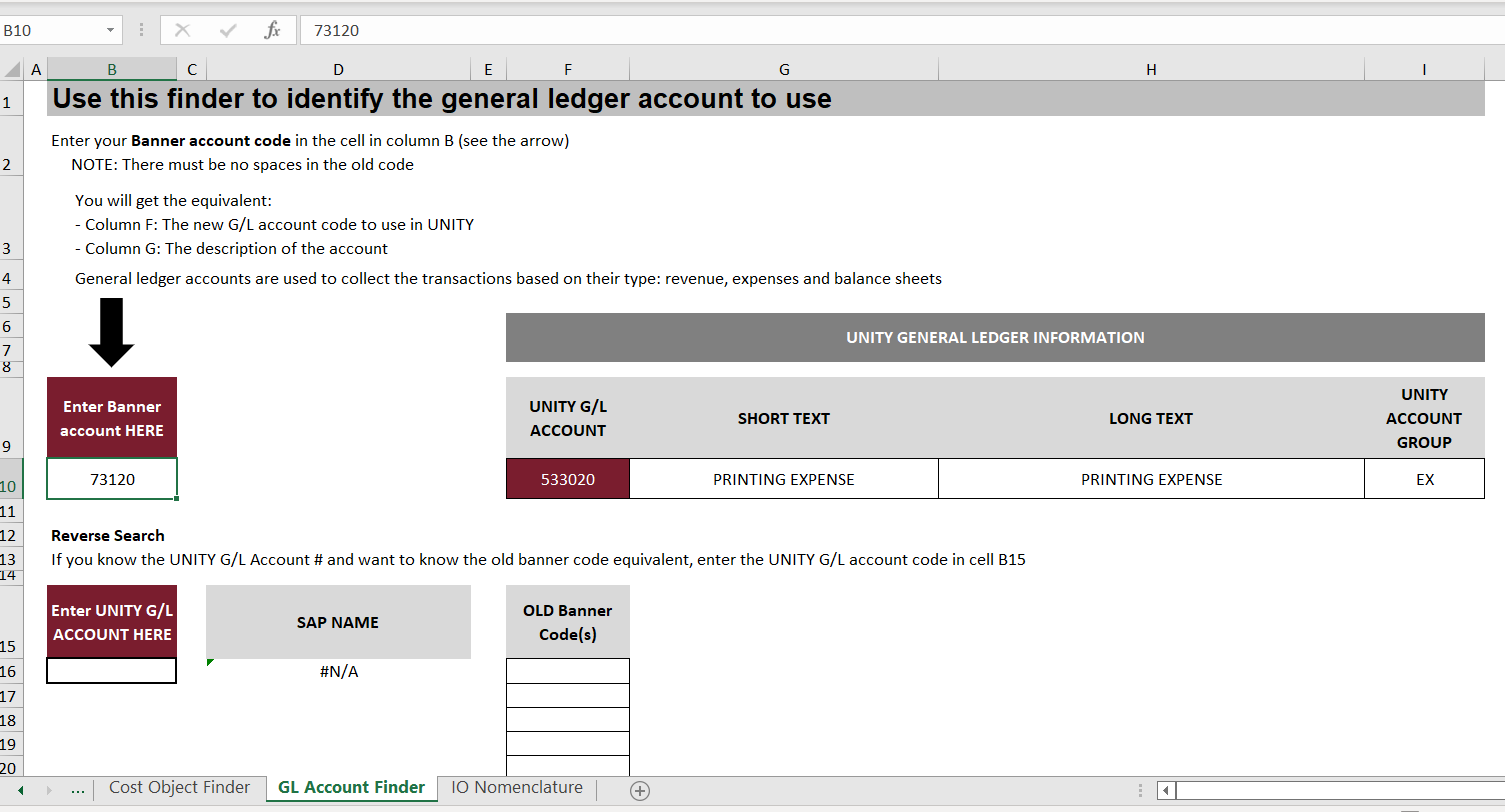
  1. Unity Cost Object finder tool: You can use the provided tool at the below link to find appropriate code.
    https://hub.concordia.ca/carrefour/projects/digital/unity/resources/cost-object-finder-tool.html

The tool is an excel file which you need to download manually. It look like this:

Thanks for passing by.

References:

  1. https://hub.concordia.ca/content/dam/cspace/projects/unity/UNITY-Expense-Allocation.pdf
  2. https://hub.concordia.ca/content/dam/cspace/projects/unity/APPROVED-UNITY-Whatcostobject.pdf
  3. https://hub.concordia.ca/carrefour/projects/digital/unity/resources/cost-object-finder-tool.html

Android Studio: How to change the launcher icon with all its format

To change the ic_launcher icon in the android studio for your application just do the following steps:

  1. Open your project or if your project is already open then do the following
  2. right click on res folder
  3. go to new->image asset

    image_asset_creation_1

  4. this will show a dialog/window
    1. select icon type as the launcher icon
    2. if you want you can change the image name
    3. asset type select image
    4. provide path & select image

      image_asset_creation_2

  5. Now finished it

There also an alternative way. Although I think that is old and Android studio new version just integrates this project from him. Thanks, Nurik. This project also has the feature of doing the followings:

  1. Launcher, action bar, notification icon generator
  2. icon animation generator
  3. simple nine patch generator

How to Select a research topic in Computer Science

I find it very difficult to choose a research topic for my MSc. or Phd. When i was thinking about my research topic, i had only one thing in mid that i have to do some thing new. But when an idea came in my mid and i search about my idea and i found that all the works are already done. So i have to re think. But it’s really tough to find a new area of research. So i have to concentrate on the existing area of research. When i think about the area some key words struck in my mind, that i have to do my works on Data mining, Big Data, Machine learning etc. But each one is a vast area and i have to choose a particular thing. So i search in the internet about how to select a research topic in computer science and came through a lot of article. Here i summarize all the article in my own words.

  1. ResearchGateNeed to remember the following things when choosing your research topic.

    1) Self-examine what is your end goal e.g. completing your PhD, publish some articles in well known journals as a result of your research, contributing research patents for your company, promotion etc. – All of them

    2) Perform more literature review by going thru as many academic articles from Computer & Applied Science Complete, Association of Computing Machinery (ACM), IEEE etc. – This is most important. Read & read is the only key to success.

    a systematic review of these issues:

    Computational Geometry
    cloud computing ,
    network security
    big data
    Data mining,
    process mining.
    social media mining
    Internet of Things (IOT),
    *refactoring vintage systems
    Business process and Service Oriented Architecture (SOA).
    Computer Vision

    In articles of high quality of sufficient recencency: consider the section “Future work”.

    3) Identify the research gap (e.g. conflicting views, ineffective solutions, problem no one exploring) in Social networking, Mobility, Analytics, Cloud (SMAC), Software Defined Infrastructure, Internet of Things (IOT), DevOps as well as security issues among those topics etc. – finding out the gap reduce the total steps

    4) Self examine your knowledge, experience, strengths, weaknesses, passion, perseverance then choose the topic best match your capability

    5) Chart out your strategy how to complete the research e.g. time, effort, financial resources, family sacrifices etc.

  2.  A good way to think like this

    1. The easiest way is to choose an area in Computer science (CS) that a lot of other people are working on. It is an advantage if you work on the same thing others are working on, they will be interested in your work and will be more willing to fund and publish it.

    2. The research area in CS  that you choose should have a chance of making a difference. Focus in making ‘something work better for someone’- ‘the more people benefit, the better’.

    3. The research area you choose needs to be one that you should enjoy working on it. Your intuition should strongly suggest that all is not right but there is much work to be done. If you’re a PhD student seeking a research assistantship, choose a research area that your advisor has a grant to work on.

    4.Read what others have done in the area of CS. What are variables that was used but was not tested, alternative use  of certain  techniques that could make a difference in your invention.

    5. Make a  summary of past studies in CS and identify  gaps (if any).

    6. Scrutinize past ‘researchers limitations’ and ‘suggestions for future research’ and  try to improve in terms of their  depth, width,  methodology etc. Overcoming certain limitations in past research could be a part of your contribution to knowledge building.
    7. read some scientific disquisitions about your favorite topic in computer science. Usually, you find suggestions about valuable future work in their concluding sections.

  3. “Computer Science is a very broad subject area. I would suggest that you first choose several sub-fields that you actually have some interest in and then do some reading to see if anything strikes a spark with you. It is much easier to work on something if you have some passion for the area. You need to be familiar with the state of the art in your chosen subject. But there is no reason why the next hot topic could not originate with yourself. “

4.

First ,one must  be specific in choosing what area in computer science to work on.

second , it is better to choose topic which might cover real life problem in computer applications.

Third, it is worth to choose subjects which have as much as possible references and previous work.

Some times it is possible to choose topic to start work from the point when it is ended by other researcher , i.e to cover new topics in old one.


5. From Quora

Let me start with a few high-level considerations for selecting research area(s) and topic(s):
A. It’s important to enjoy the process of doing research in a given area —
reading papers, solving problems and proving theorems,
developing algorithms, designing systems, writing software,
evaluating systems, running computational experiments,
working with data, writing papers and giving talks, collaborating
with others, keeping track of industry developments, etc.
Fortunately, I enjoy most of those activities, so I rotate between
several areas and roles, to get the right mix 🙂
B. There should be growth in the area.
C. Your skills and expertise should be adequate for success in this area
(but some studying is often needed anyway)
D. You need to see the (potential) impact of your work
(be it software or theory)
E. There should be possibilities to collaborate with others
and work with graduate students who are sharp, capable or both.
F. When moving to a new area, it is very important to have someone
with different expertise who can constructively criticize your work.

It is also a really good idea to create choices so that you can maximize these parameters. As tastes change, research directions come and go, and (most importantly) the reality evolves, Computer Science and Engineering allow for a huge amount of freedom for lateral and vertical movement, and also for technical growth (assuming broad interests, good technical background, and desire to learn). Keep in mind that maintaining freedom should not be to the detriment of productivity – if you have “a fear of commitment”, you won’t get much done and will not enjoy the process.

Another consideration in my experience:
Having strong links to applications (in some of my projects) helps with industry funding, which comes with fewer constraints than federal funding and adds to flexibility. As long as the work is in the general area for which the funding was allocated, I can assign students for a project within a month of coming up with an idea. Vice versa, if I realize that things don’t work, we can turn around and work on something else. This allows to try risky ideas without getting bogged down in things that don’t work. Contrast this with the usual grant proposal cycle, where principal investigators often promise “safe” things that can definitely be done (otherwise, there’d be too much risk in the proposal).

Hopefully, this is the type of information you are looking for.

Daniel Martín

Daniel Martín, CS PhD student

3.5k ViewsUpvoted by Jessica Su, CS PhD student at Stanford

In my case, it all started when I did my final year project in Computer Vision. I enjoyed it a lot and my Cryptography teacher encouraged me to do research. Right after I graduated, I worked on an augmented reality startup and I had the chance to apply Computer Vision algorithms in practice.

I got hooked to university and I missed it so much that I decided to go to graduate school and complete a MEng. (my Master’s Thesis was about a problem I experienced in my augmented reality startup). Now I’m following with the PhD.

The thing that I like so much about Computer Vision is that you are contributing to the most fundamental AI problem: Make computers as smart as a human being. And it is a field that touches many different fields, such as Computational Geometry, Optics, Machine Learning, etc., so you never cease to learn new things.

If everything fails. Take helps from this topic generator.

Web Site Reference :

IEEE, ACM and Springer Verlag

Algorithm Introduction

Here is the syllabus for Algorithm:

  1. Introduction: algorithm specification, performance analysis;
  2. Elementary Data Structures: sets and disjoint set union;
  3. Divide-and-Conquer: convex hull;
  4. The Greedy Method: knapsack problem, tree vertex splitting, job sequencing with deadlines, minimum-cost spanning trees, optimal storage on tapes, single-source shortest paths;
  5. Dynamic Programming: multistage graphs, all pairs shortest paths, the traveling salesperson problem, flow shop scheduling;
  6. Basic Traversal and Search Techniques: BFS and DFS, connected components and spanning trees, bioconnected components and DFS;
  7. Backtracking: The 8-queens problem, graph coloring, Hamiltonian cycles;
  8. Branch and Bound: Least Cost (LC) search, The 15-puzzle, bounding;
  9. Flow Algorithms; Number Theoretic Algorithms .

Web Engineering Introduction

  • What is Web Technology  or :

Web engineering actively promotes systematic, disciplined and quantifiable approaches towards successful development of high-quality, ubiquitously usable Web-based systems and applications. n the World Wide Web. In particular, Web engineering focuses on the methodologies, techniques and tools that are the foundation of Web application development and which support their design, development, evolution, and evaluation.

Web engineering is multidisciplinary and encompasses contributions from diverse areas: systems analysis and design, software engineering, hypermedia/hypertext engineering, requirements engineering, human-computer interaction, user interface, information engineering, information indexing and retrieval, testing, modelling and simulation, project management, and graphic design and presentation.

Web Development can be split into many areas and a typical and basic web development hierarchy might consist of:

Client-side coding

  • Ajax Asynchronous JavaScript provides new methods of using JavaScript, and other languages to improve the user experience.
  • Flash Adobe Flash Player is a ubiquitous browser plugin ready for RIAs. Flex 2 is also deployed to the Flash Player (version 9+).
  • JavaScript JavaScript is a ubiquitous client side platform for creating and delivering rich web applications that can also run across a wide variety of devices. It is a dialect of the scripting language ECMAScript.
  • jQuery Cross-browser JavaScript library designed to simplify and speed up the client-side scripting of HTML.
  • AngularJS, Backbone.js, Ember.js and React are client-side MVC technologies introduced for building single page application and offline applications for both desktop and mobile. They make the application more modular and also help dramatically increase development speed.
  • Microsoft Silverlight Microsoft’s browser plugin that enables animation, vector graphics and high-definition video playback, programmed using XAML and .NET programming languages.
  • HTML5 and CSS3 Latest HTML proposed standard combined with the latest proposed standard for CSS natively supports much of the client-side functionality provided by other frameworks such as Flash and Silverlight
  • Scalable Vector Graphics (SVG), WebGL and Canvas deliver 2D and 3D capabilities, often used through JavaScript libraries; D3js (2D datavisualisations) and threeJS (3D) are popular examples.

Looking at these items from an “umbrella approach”, client side coding such as XHTML is executed and stored on a local client (in a web browser) whereas server side code is not available to a client and is executed on a web server which generates the appropriate XHTML which is then sent to the client. The nature of client side coding allows one to alter the HTML on a local client and refresh the pages with updated content (locally), web designers must bear in mind the importance and relevance to security with their server side scripts. If a server side script accepts content from a locally modified client side script, the web development of that page is poorly sanitized with relation to security. In many companies, developers who are responsible for the client side coding and user interface codes are called Front-end Developer.

Server-side coding

Client side + server side

  • Google Web Toolkit provides tools to create and maintain complex JavaScript front-end applications in Java.
  • Dart provides tools to create and maintain complex JavaScript front-end applications as well as supporting server-side code in Dart (programming language).
  • Opa is a high-level language in which both the client and the server parts are implemented. The compiler then decides which parts run on the client (and are translated automatically to JavaScript) and which parts run on the server. The developer can tune those decisions with simple directives. (open source)
  • Pyjamas is a tool and framework for developing Ajax applications and Rich Internet Applications in Python.
  • Tersus is a platform for the development of rich web applications by visually defining user interface, client side behavior and server side processing. (open source)

However languages like Ruby and Python are often paired with database servers other than MySQL (the M in LAMP). Below are example of other databases currently in wide use on the web. For instance some developers prefer a LAPR (Linux/Apache/PostgreSQL/Ruby on Rails) setup for development.

Database technology

* open source / public domain

Basic linux commands

Mos of us are not comfortable with command line arguments (CLI) and its really not necessary. It is important, of course, to know how to use the command-line terminal – and anyone who can manage typing, backspacing, and cutting and pasting can manage the command-line terminal (it is not more difficult than that). Here are some basic commands with explanation:

Where to write command:

To write a command ones needs to go to terminal. To go terminal use one of the following approach. I am using Ubuntu 14.04 version.

            Dash -> Search for Terminal

            Dash -> More Apps -> ‘See More Results’ -> Terminal

            Dash -> More Apps -> Accessories -> Terminal

            Keyboard Shortcut: Ctrl + Alt + T

  1. sudo:_Executing_Commands_with_Elevated_Privileges

               Most of the following commands will need to be prefaced with the sudo command. It allows authorized      users   (normally “Administrative” users; for further information please refer to AddUsersHowto) to run certain programs as root without having to know the root password.

This means that in the terminal you should use sudo for commands that require root privileges; simply prepend sudo to all the commands you need to run as root. For more extensive usage examples, please see below. Similarly, when you run GUI programs that require root privileges (e.g. the network configuration applet), use graphical sudo and you will also be prompted for a password (more below). Just remember, when sudo asks for a password, it needs YOUR USER password, and not the root account password.

To repeat the last command entered, except with sudo prepended to it, run:

sudo !!

To add a new user with root privilage

In the terminal (for Precise Pangolin, 12.04), this would be:

sudo adduser <username> sudo

where you replace <username> with the name of the user (without the <>).

In previous version of Ubuntu

sudo adduser <username> admin

Logging in as another user

Please don’t use this to become root, see further down in the page for more information about that.

sudo -i -u <username>

For example to become the user amanda for tape management purposes.

sudo -i -u amanda

The password being asked for is your own, not amanda’s.

Enabling the root account

sudo -i

To enable the root account (i.e. set a password) use:

sudo passwd root

Re-disabling your root account

sudo passwd -dl root

Reset sudo timeout

You can make sure sudo asks for password next time by running:

sudo -k

2.

How to generate Facebook release key Hash & debug Key Hash for android apps

When you want to publish an app in google play store that has facebook app integrated, it needs a release key hash for the facebook app that must be provided to facebook app in facebook developer console. Here is the process of creating facebook keyhash http://stackoverflow.com/questions/4388992/key-hash-for-android-facebook-app This is the link from stackOverflow site, I will describe details in the weekend.

Android Push Notification with GCM & SNS

Today I describe my experience, How to use Google Cloud Messaging(GCM) with Amazon Simple Notification Service(SNS) to deliver a push notification to the end user to an android application.

In Android to generate push notification ones need three things
1. An Email address for registering android apps to GCM

2. An Android application

3. An third party Server to send notification to device specific application(we use SNS for this purpose)

First Step:

If you have an gmail account which password you know that’s fine. if you have not any gamil account than go to this link and create an gmail account for free 🙂
Note: You Should use an gmail account that is not used as an end user account. the gmail best like  <yourAppName>@gmail.com


Second Step:

Register this gmail account(apps gmail account :P) to GCM . You have to log in for registering.  Follow this direction for successfully register your app. You have to specify your app package name. Note: specify a package name that you use to create your android apps. After successful registration you will get an API key that will used in the next step.

Third Step:

Creating your android name. Create an android project with package name you stated in Second Step.

Fourth Step:

Registering user with your application to  GCM to get an registraionID(device specific) which is used for next step. To register user follow this instruction 

Now you have an RegistraionId for user device with your app installed. Now send this registrationID to third party server. for third party server we use amazon web service(AWS).


Fifth Step:

Create an account in amazon web service(AWS) . this give you amazon credentials. amazon apps key ID & security key which will be used latter.

Sixth Step:

Use amazon credentials to directly send notification to end user or subscribe a topic.
view this link for details.


Latter i will explain every step with sample code & screen shot. Cheers…………..